Using Application Deployment Manager to Deploy Responsibilities across Environments
Siebel Version: 8.1.1.9
I had a requirement recently to add thousands of Users to a particular view, I didn't have time to created a client side business service nor a .COM data loader so decided to use ADM. It turned out that ADM was the quickest and simplest way of meeting this requirement.
I have added the steps taken:
STEP A - Generating the ADM XML from the Source Environment.
01. Create an Deployment Project
- Navigate to Site Map > Application Deployment Manager > Deployment Project
- Create a Record and for the Data Type Child Record select the Data Type 'Responsibility'.

- Navigate to Site Map > Application Deployment Manager > Deployment Session
- Create a record, pick in the Project Name you created in Step 1, select the Export to File flag.
- In the lower applet either select the Deployment Mode (Either Synchronise or Upsert).
- Provide a Deployment Filter to bring back the record you wish to export (e.g [Responsibility.Name] = 'Our Responsibility'), press the 'Validate Filter' button to ensure there are no Syntax Errors.

03 Generate and Export the XML.
- Click on the 'Deploy' Button to generate the ADM XML (Note: This will be exported to a folder on the Server)
- Supply folder to export the ADM XML too, this will be in the form of a network path. IMPORTANT: Ensure that this folder is accessible by the Siebel Application (i.e that that the folder is Shared).

STEP B - Manipulating the Generated XML.
1-XXXXXX.ini
1-XXXXXX_Responsibility.xml
1-XXXXXX_Responsibility_des.xml
Changing the EAI Method
If you open up the XML up using Notepad++ we can actually change the EAI Method used against the Integration Object. If this is a new Responsibility with new Views/Users you most probably want 'Synchronize', in my case I needed to add a few thousand Users to an existing Responsibility so I used 'Upsert'.

Manipulating the XML Definition of Users
Siebel out the box will spit out the XML Definition of the User IC containing many fields that we simply don't need, in my case I had a thousands of Users to add with just their LOGIN ID's to identify them. So I needed to adjust the User XML definition so that I just needed to supply the LOGIN details and Siebel would still process the record.
So this is what I did:
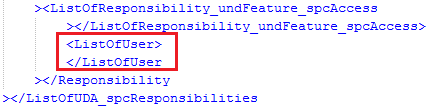
(a) Rip out all the XML bwtween <ListOfUser> and </ListOfUser>, thus there are no Users in the XML.
Note: Incidentally if you want to remove all the Users against a Responsibility, just run a
Synchronize with no Users and this is a very quick way of disassociating a significant number of
users from a Responsibility.
(b) Re-Format the XML for Users and add it back in
We can use the following XML to define each User where the User Login is SIEBELUSER1:
<User><_sblesc_und_undPROPERTIES_und_und><Login_spcName>
SIEBELUSER1</Login_spcName><Login_spcDomain></Login_spcDomain></_sblesc_und_undPROPERTIES_und_und></User>
One can regenerate the XML for thousand if Users by using Excel to concatenate the Left Hand side of the
XML, followed by the User Login (taking case that there are no spaces caught up in the XML) and then the
Right hand side of the XML.
This re-generated XML excel can be pasted back into the original Responsibility XML.


STEP C - Loading the updated XML into the Target Environment.
To load the XML back into Siebel navigate back Site Map > Application Deployment Manager > Deployment Sessions. On the Deployment Sessions List Applet click on Menu Button > Deploy from Local File, pick the file that you generated in Step B.

SQL to help withs Users/Views/Responsibilities
SQL to list all Views that are associated to a Responsibility:
select A.NAME,
S_APP_VIEW.NAME
from SIEBEL.S_RESP A
left outer join SIEBEL.S_APP_VIEW_RESP C
on A.ROW_ID = C.RESP_ID
left outer join SIEBEL.S_APP_VIEW
on C.VIEW_ID = S_APP_VIEW.ROW_ID
where A.NAME in ('Any Old Resp 1', 'Any Old Resp 2')
SQL to list all Responsibilities associated to a View/s:
select A.NAME,
S_RESP.NAME
from SIEBEL.S_APP_VIEW A
left outer join SIEBEL.S_APP_VIEW_RESP C
on A.ROW_ID = C.VIEW_ID
left outer join SIEBEL.S_RESP
on C.RESP_ID = S_RESP.ROW_ID
where A.NAME in ('Any Old View 1', 'Any Old View 2')
SQL to list all Responsibilities used by specified Users
(Where the Users ID are Supplied)
select A.NAME,
count(*)
from SIEBEL.S_RESP A
left outer join SIEBEL.S_PER_RESP C
on A.ROW_ID = C.RESP_ID
left outer join SIEBEL.S_USER
on C.PER_ID = S_USER.ROW_ID
where S_USER.LOGIN in ('User1', 'User2', 'User2', 'User3')
Group By A.NAME
select A.NAME
from SIEBEL.S_RESP A
left outer join SIEBEL.S_PER_RESP C
on A.ROW_ID = C.RESP_ID
left outer join SIEBEL.S_USER
on C.PER_ID = S_USER.ROW_ID
where S_USER.LOGIN in ('User1')
ORDER BY NAME ASC
SQL to list the number of Users using a Responsibility
(Where the Users ID are Supplied)
select A.NAME,
count(*)
from SIEBEL.S_RESP A
left outer join SIEBEL.S_PER_RESP C
on A.ROW_ID = C.RESP_ID
left outer join SIEBEL.S_USER
on C.PER_ID = S_USER.ROW_ID
where A.NAME in ('Siebel Responsibility')
Group By A.NAME
SQL to list all Users by Login using a Responsibility
(Where the Users ID are Supplied)
select
A.NAME,
S_USER.LOGIN from SIEBEL.S_RESP A
left outer join SIEBEL.S_PER_RESP C
on A.ROW_ID = C.RESP_ID
left outer join SIEBEL.S_USER
on C.PER_ID = S_USER.ROW_ID
where A.NAME in ('Siebel Responsibility')
Does a User have a Particular View
select
A.NAME,
D.FST_NAME,
D.LAST_NAME,
JOB_TITLE,
F.LOGIN from SIEBEL.S_RESP A
left outer join
SIEBEL.S_PER_RESP C
on A.ROW_ID = C.RESP_ID
left outer join SIEBEL.S_USER F
on C.PER_ID = F.ROW_ID
left outer join SIEBEL.S_CONTACT D
on F.PAR_ROW_ID = D.ROW_ID
where A.NAME LIKE '%xyz%'